How to Make Fish Tank Decorations at Home: Creative DIY Ideas
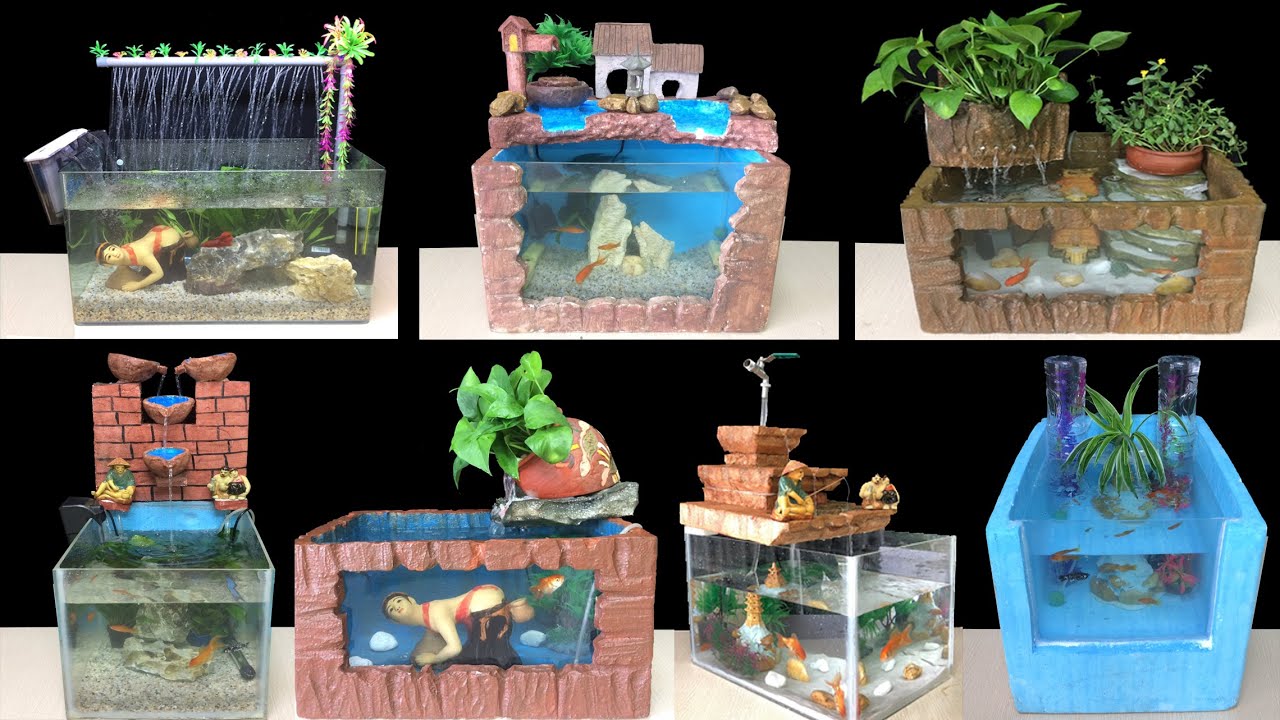
Creating fish tank decorations at home is fun and cost-effective. You can personalize your aquarium to suit your style.
Many people enjoy decorating their fish tanks, but store-bought items can be expensive. Making your own decorations allows for creativity and saves money. With a few simple materials, you can craft unique and safe items for your fish. This guide will show you how to create beautiful decorations at home.
You’ll learn easy steps and tips to ensure your fish have a safe and attractive environment. Let’s dive into the world of DIY fish tank decorations and transform your aquarium into a personalized underwater paradise.

Credit: www.facebook.com
Choosing The Right Materials
Creating fish tank decorations at home can be a fun and rewarding project. It’s crucial to choose the right materials to ensure the safety and well-being of your fish. In this section, we will discuss the best materials for making safe and eco-friendly decorations.
Safe Materials For Fish
When making decorations for your fish tank, always opt for non-toxic materials. These materials won’t harm your fish or affect the water quality. Here are some safe options:
- Rocks and Stones: Ensure they are smooth and free from sharp edges.
- Driftwood: Make sure it is properly treated and free from chemicals.
- Ceramic: Use ceramics that are labeled as aquarium-safe.
- Plastic: Only use food-grade or aquarium-safe plastics.
Avoid materials that may leach harmful substances into the water. For example, metals can rust and degrade over time. Painted items should be avoided unless they are specifically made for aquariums.
Eco-friendly Options
Being kind to the environment is important, even when decorating your fish tank. Consider using eco-friendly materials for your tank decorations. Here are some ideas:
- Recycled Glass: Creates a beautiful and safe environment.
- Bamboo: A sustainable and natural choice.
- Coconut Shells: Offer a natural hiding place for fish.
You can also use natural items from your garden or local environment. Just ensure they are cleaned and free of pesticides or chemicals. Using eco-friendly materials helps protect both your fish and the planet.
Choosing the right materials is the first step to creating a safe and beautiful home for your fish. Always prioritize the health and safety of your aquatic friends while being mindful of the environment.
Basic Tools Needed
Creating your own fish tank decorations can be a fun and rewarding project. It allows you to customize your aquarium’s look and feel. To get started, you’ll need a few basic tools. This guide will help you gather everything you need to begin your DIY project.
Essential Tools
First, gather the essential tools. These are the must-haves for any fish tank decoration project.
- Scissors: Use sharp scissors to cut materials cleanly.
- Glue Gun: A hot glue gun helps to stick materials together quickly.
- Sanding Paper: Smooth rough edges with sanding paper to prevent injuries to your fish.
- Paintbrushes: Different sizes of paintbrushes will help you add color and detail.
- Non-Toxic Paints: Always use fish-safe, non-toxic paints to ensure the safety of your pets.
Optional Tools
For more advanced projects, you might need a few optional tools. These can help you create more complex and detailed decorations.
- Clay Sculpting Tools: These are useful for shaping and detailing clay decorations.
- Utility Knife: A sharp utility knife can help with precise cuts.
- Airbrush: An airbrush can provide a smooth, even coat of paint.
- Measuring Tape: Use a measuring tape for accurate dimensions.
- Drill: A small drill can help you create holes and other details.
Designing Your Decorations
Creating your own fish tank decorations can be a fun and rewarding project. It allows you to give your aquarium a personal touch. Designing your decorations involves careful planning and creativity. Here are some steps to help you get started.
Sketching Ideas
Begin by sketching ideas on paper. Think about the theme you want for your tank. Do you prefer a natural look or something more whimsical? Draw simple shapes and designs. Keep in mind the size of your tank and the space available. Use a pencil to make adjustments easily.
Consider these elements while sketching:
- Rocks
- Plants
- Caves
- Sunken Ships
Sketching helps you visualize your ideas before you start building. It reduces the chance of mistakes.
Selecting Colors
Next, selecting colors is an important step. Think about the colors that will complement your fish and tank environment. Bright colors can make the tank lively. Natural tones can create a calm atmosphere.
Here is a simple table to help you choose colors:
| Element | Suggested Colors |
|---|---|
| Rocks | Gray, Brown, Black |
| Plants | Green, Light Green |
| Caves | Dark Brown, Dark Gray |
| Sunken Ships | Rusty Red, Dark Blue |
Use non-toxic paint to ensure the safety of your fish. Test the colors on a small piece before applying them to your decorations.

Credit: m.youtube.com
Creating Natural-looking Rocks
Creating natural-looking rocks for your fish tank can be both fun and fulfilling. Using simple materials, you can craft unique pieces that enhance your aquarium’s beauty. In this section, we’ll explore two easy methods to create realistic rocks at home.
Using Clay And Paint
First, gather your materials. You’ll need some air-dry clay, non-toxic paint, and a few basic tools. Start by shaping the clay into rock-like forms. Keep the shapes irregular for a natural look. Allow the clay to dry completely.
Once dry, it’s time to paint. Choose earthy tones like browns, grays, and greens. Use a sponge or brush to dab the paint onto the clay. Layering different colors will give the rocks depth and realism. Let the paint dry thoroughly before placing your rocks in the tank.
Adding Texture
Adding texture is crucial for making your rocks look realistic. You can use various household items to imprint textures into the clay. Here are a few ideas:
- Use a toothbrush to create small indentations.
- Press coarse sandpaper against the clay for a rough surface.
- Imprint leaves or twigs to mimic natural patterns.
After adding texture, let the clay dry. Then, paint as described earlier. The texture will enhance the overall appearance of your rocks, making them look more like real stones.
Creating natural-looking rocks for your fish tank is a simple yet rewarding project. With clay, paint, and a bit of creativity, you can transform your aquarium into a stunning underwater landscape.
Building Diy Caves And Hiding Spots
Creating a vibrant and engaging environment for your fish can be a fun and fulfilling project. One way to enhance your fish tank is by building DIY caves and hiding spots. These additions not only make your aquarium look more natural but also provide essential shelter for your fish. Fish love having places to hide and explore, making them feel safe and secure.
Using Pvc Pipes
PVC pipes are a great material for building fish tank caves. They are cheap, easy to cut, and come in various sizes. You can find PVC pipes at any hardware store. To start, cut the pipes into different lengths. Ensure the edges are smooth to avoid harming your fish.
Arrange the pipes in your tank to create tunnels and hiding spots. You can stack them or place them side by side. Get creative with the layout. To make the pipes blend in, cover them with aquarium-safe materials. Gravel, stones, or even aquarium glue can help disguise the pipes. This makes the caves look more natural and appealing.
Decorating With Moss
Moss is an excellent choice for decorating your DIY caves. It adds a touch of greenery and mimics a natural habitat. Java moss is a popular type for aquariums. It is easy to maintain and grows well underwater.
To attach moss to your PVC pipes, use aquarium-safe glue or thread. Spread the moss evenly over the surface. It will start to grow and cover the pipes, creating a beautiful, lush environment. Moss provides additional hiding spots and surfaces for beneficial bacteria to grow.
These steps will not only make your fish tank look amazing but also create a healthier environment for your fish. They will enjoy exploring their new caves and hiding spots, making your tank lively and interesting.
Crafting Custom Plants
Creating your own fish tank decorations can be a fun and rewarding activity. One popular option is crafting custom plants. These plants can add a unique touch to your aquarium. Plus, they provide a safe and beautiful environment for your fish.
Using Plastic Plants
Plastic plants are a great choice for fish tank decorations. They are durable and easy to clean. Begin by choosing the right type of plastic plants. Look for plants made from non-toxic materials. This ensures they are safe for your fish.
Next, arrange your plastic plants in the tank. Use different sizes and shapes to create variety. Place taller plants at the back and shorter ones at the front. This creates depth and interest.
You can also add small rocks or pebbles around the base of the plants. This helps to anchor them and adds to the natural look.
Painting Techniques
Painting plastic plants can give them a custom look. Use non-toxic, waterproof paint for this project. Acrylic paint is a good option. Start by cleaning the plastic plants thoroughly. This ensures the paint will adhere properly.
Apply a base coat of paint. Use a light color to make the plant look more realistic. Once the base coat is dry, add details with darker shades. Use a small brush to paint veins and edges. This adds depth and dimension.
Allow the paint to dry completely before placing the plants in your tank. A clear, waterproof sealant can help protect the paint. This keeps your custom plants looking fresh and vibrant.
Making Decorative Backgrounds
Making decorative backgrounds for your fish tank can transform its look. A beautiful background can create an immersive environment for your fish. You can make 3D backgrounds or painted backgrounds at home. Both types offer unique aesthetics and are quite easy to create.
3d Backgrounds
3D backgrounds add depth and dimension to your fish tank. Start with a piece of foam board that fits the back of your tank. Use a knife to carve out rock shapes or other designs. Once carved, coat the foam with a layer of cement or aquarium-safe epoxy. This will harden the surface and make it waterproof. After the coating dries, paint it with non-toxic, water-resistant paints. Let it dry completely before placing it in the tank.
Painted Backgrounds
Painted backgrounds are simpler and quicker to create. You can paint directly on the outside of the tank or on a separate piece of paper or board. Use acrylic paints as they are waterproof and safe for aquariums. Choose colors that match the theme of your tank. You can paint scenes of underwater plants, rocks, or even abstract designs. Let the paint dry completely before attaching the background to the tank.

Credit: www.facebook.com
Safety Tips For Diy Decorations
Creating your own fish tank decorations can be a fun and rewarding activity. It allows you to customize your aquarium to match your style. Before you start, it’s crucial to keep safety in mind. Fish are sensitive creatures, so ensuring your DIY decorations are safe is key.
Non-toxic Paints
Use only non-toxic paints for your fish tank decorations. Regular paints may contain harmful chemicals. These chemicals can leach into the water and harm your fish. Acrylic paints labeled as non-toxic are a good choice. They are safe for both fish and plants.
Securing Decorations
Make sure all decorations are securely placed. Loose items can pose a danger to fish. Fish might get trapped or injured by unsecured objects. Use aquarium-safe glue to fix decorations in place. This prevents them from moving or falling over.
Maintaining Your Diy Decorations
Maintaining your DIY fish tank decorations ensures they remain safe and attractive. Proper care helps preserve their beauty and functionality. Keep your decorations clean and long-lasting with the following tips.
Cleaning Tips
Regular cleaning keeps your fish tank decorations looking fresh. Use a soft brush to gently remove algae and debris. Avoid harsh chemicals that can harm your fish. Rinse decorations thoroughly with warm water. Scrub gently to prevent damage. Clean your decorations monthly to maintain their appearance.
Longevity Strategies
Choose materials that can withstand water and wear. Seal porous items with aquarium-safe sealant. This prevents them from deteriorating. Place decorations carefully to avoid damage from fish activity. Rotate decorations periodically to distribute wear evenly. Store unused decorations in a dry place. This helps them last longer.
Conclusion
Creating fish tank decorations at home is fun and rewarding. You can use simple materials. Make unique designs that your fish will love. Remember to use safe, non-toxic items. Experiment with different ideas and be creative. Enjoy the process and watch your tank come to life.
Your homemade decorations will add a personal touch. Your fish will appreciate the new environment. Happy crafting and enjoy your beautiful aquarium!


