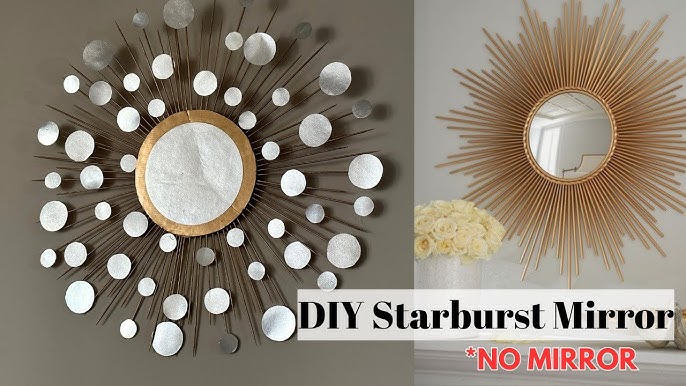
How to Make Decorative Mirror at Home: Easy DIY Guide
Creating a decorative mirror at home can be a fun and rewarding project. It adds a personal touch to your space and showcases your creativity.
Decorating your home with unique pieces can transform any room. One such item is a decorative mirror. You don’t need to spend a lot of money to get one. With a few materials and some creativity, you can make a beautiful mirror right at home.
This project allows you to customize the design to match your style and the decor of your home. Whether you prefer a minimalist look or something more ornate, making your own decorative mirror is easier than you might think. Plus, it’s a great way to add a personal touch to your living space. Ready to get started? Let’s dive into the steps to create your own decorative mirror.

Credit: m.youtube.com
Materials Needed
Creating a decorative mirror at home can be a fun and rewarding project. To ensure your mirror turns out beautifully, you’ll need a few essential materials. These materials are divided into two categories: essential tools and decorative items. Gathering these will set you up for success.
Essential Tools
First, you need a mirror. Choose a size that fits your space. You will also need a hot glue gun. This tool helps attach decorative items securely. Next, grab a pair of scissors. You will use these for cutting any materials to size.
A measuring tape is also important. This ensures accuracy when placing decorations. Lastly, have a clean cloth on hand. You will use it to wipe the mirror surface clean before starting.
Decorative Items
Now, let’s talk about the fun part – decorating! You can use various items to adorn your mirror. Consider colorful beads or glass stones. These add a touch of elegance. Fabric or ribbon can also be used. They bring in texture and pattern.
Shells and pebbles work great for a beachy vibe. Or, try using faux flowers for a floral theme. The options are endless. Pick items that match your style and home décor.
Choosing The Mirror
Creating a decorative mirror at home starts with choosing the right mirror. This decision lays the foundation for your entire project. Consider the size, shape, and quality of the mirror to ensure it fits your space and style.
Size And Shape
The size of the mirror depends on where you plan to place it. For instance, a large mirror can make a small room feel bigger. In contrast, a small mirror works well in narrow spaces like hallways.
Shape also plays a crucial role in the mirror’s visual impact. Common shapes include:
- Round: Adds a soft, elegant touch.
- Square: Provides a modern, clean look.
- Rectangle: Versatile and timeless.
- Oval: Combines softness and elegance.
Choose a shape that complements your room’s design and furniture. A round mirror can soften sharp lines, while a square mirror can add structure.
Mirror Quality
The quality of the mirror is just as important as its size and shape. Look for mirrors with high-quality glass. This ensures a clear reflection without distortions.
Consider these factors:
- Thickness: Thicker mirrors are more durable and less likely to warp.
- Edge Treatment: Beveled edges add a decorative touch. Polished edges offer a sleek finish.
- Backing: A good backing protects the mirror from damage and moisture.
Investing in a high-quality mirror will make your decorative piece look better and last longer. Pay attention to these details to create a stunning mirror that enhances your home decor.
Preparing Your Workspace
Creating a decorative mirror at home can be a fun and rewarding project. Before you start, it’s essential to prepare your workspace. A well-prepared workspace ensures a smooth crafting experience and keeps you safe from accidents. Let’s dive into the steps to set up your workspace efficiently.
Safety Measures
Safety should be your top priority. Start by wearing protective gloves to safeguard your hands. Use safety goggles to protect your eyes from any flying debris. Ensure your workspace is well-ventilated to avoid inhaling any harmful fumes. Keep a first aid kit nearby for emergencies.
Organizing Materials
Gather all the materials you’ll need for your project. This might include the mirror, adhesive, decorative items, and cleaning supplies. Arrange these items in an orderly manner on your workspace. Keep frequently used tools within easy reach to avoid unnecessary movements.
Label containers for small items like beads, stones, or tiles. This helps you find what you need quickly. Use a clean, flat surface to work on. Ensure there’s enough space to move around comfortably. A well-organized workspace boosts efficiency and creativity.
Design Planning
Creating a decorative mirror at home can be a fun and rewarding project. The first step is design planning. A well-thought-out plan ensures that your mirror will be both beautiful and functional. This section will guide you through the essential steps in planning your design.
Sketching Your Design
Start by sketching your design on paper. This helps you visualize the final product. Use a pencil and ruler for precision. Keep your sketches simple and clear. Consider the shape and size of your mirror. Do you want a round, oval, or square mirror?
Next, add decorative elements. These can be anything from geometric patterns to floral designs. Keep in mind the materials you plan to use. Are you using tiles, beads, or paint? Sketch these details to see how they fit together.
Choosing A Theme
Choosing a theme is crucial for a cohesive look. Themes can range from modern and minimalist to rustic and vintage. Consider the room where the mirror will hang. The theme should complement the room’s decor.
Here are some popular themes to consider:
- Bohemian
- Industrial
- Shabby Chic
- Art Deco
Once you have chosen a theme, pick colors and materials that match. For a bohemian theme, you might use bright colors and natural materials. For an industrial look, opt for metal and darker colors.
Design planning sets the foundation for your decorative mirror project. It ensures that all elements come together harmoniously. This makes your mirror not just a functional piece, but a work of art.
Cutting And Shaping
Creating a decorative mirror at home can be a fun and rewarding experience. The cutting and shaping process is crucial to achieve a professional finish. This step involves preparing the frame and ensuring the edges are smooth. Let’s dive into how to cut and shape your mirror frame effectively.
Cutting The Frame
Start with measuring the dimensions of your mirror. Use a measuring tape for accuracy. Mark the measurements on your frame material with a pencil. Ensure the lines are straight and visible.
Next, use a saw to cut the frame pieces. A miter saw is ideal for this task. It allows for precise cuts at different angles. If you don’t have a miter saw, a hand saw can work too. Just take your time and make sure the cuts are clean.
After cutting the pieces, arrange them around the mirror to check the fit. Adjust if necessary to ensure a snug fit. This step is crucial for a seamless look.
Smoothing Edges
Once the frame pieces are cut, it’s time to smooth the edges. Use sandpaper to remove any rough spots. Start with coarse sandpaper and gradually move to finer grit. This will ensure a smooth finish.
Pay special attention to the corners. They should be smooth and even. This not only enhances the appearance but also prevents any accidental injuries.
After sanding, wipe the frame pieces with a damp cloth. This removes dust and prepares the surface for painting or staining. Smooth edges make a big difference in the final look of your decorative mirror.
Assembling The Frame
Assembling the frame is a crucial step in making a decorative mirror at home. It requires precision and patience. A well-assembled frame adds to the overall beauty of the mirror.
Joining Pieces
Start by laying out all the frame pieces. Ensure they align correctly. Use wood glue on the ends of each piece. Press them together firmly. Wipe off any excess glue with a damp cloth.
Next, use corner clamps to hold the pieces together. This ensures the joints stay secure while the glue dries. Let the glue set for at least 30 minutes.
Reinforcing Joints
Once the glue is dry, remove the clamps. Check the joints for stability. Reinforce them using small nails or screws. Place them at an angle for added strength.
If using nails, gently hammer them into place. For screws, use a drill for better precision. Make sure not to split the wood.
After reinforcing, sand the edges of the frame. This smooths out any rough spots. Your frame is now ready for the next step.
Decorating The Mirror
Once you have a plain mirror, decorating it can be a fun project. You can use different materials to make it unique. Here are some steps to help you create a beautiful decorative mirror at home.
Adding Ornaments
Ornaments can make your mirror stand out. You can use beads, seashells, or small stones.
- Beads: Glue colorful beads around the mirror’s edge.
- Seashells: Create a beach theme with seashells.
- Small Stones: Use stones for a natural look.
Arrange the ornaments in a pattern. Use strong glue to ensure they stay in place.
Painting And Finishing
Painting the mirror frame can add a personal touch. Choose a color that matches your room.
- Sand the Frame: Smooth the surface for better paint adhesion.
- Apply Primer: Use primer to prepare the frame for painting.
- Paint the Frame: Use a brush or spray paint. Apply two coats for a smooth finish.
After painting, let the frame dry completely. Add a protective finish to keep the paint from chipping.
Now, your mirror is ready to hang. Enjoy your new decorative piece!

Credit: www.pinterest.com
Final Touches
Final touches are crucial in making your decorative mirror stand out. This stage involves securing decorations and cleaning the mirror. Paying attention to these steps ensures your mirror looks polished and professional.
Securing Decorations
First, ensure all decorations are firmly attached. Use hot glue or strong adhesive. Apply the glue carefully to avoid visible excess. Press decorations firmly to secure them in place. Hold them for a few seconds to ensure a strong bond. Check each piece to confirm it is attached securely. Avoid moving the mirror until the glue is fully dry. This prevents decorations from shifting. Patience at this stage pays off in a well-finished product.
Cleaning The Mirror
Once decorations are secure, clean the mirror surface. Use a gentle glass cleaner. Spray the cleaner onto a soft cloth, not directly onto the mirror. This prevents streaks and damage to decorations. Wipe the mirror in circular motions for a spotless finish. Make sure no cleaner touches the decorations. Clean around each decoration carefully. Double-check for any smudges or fingerprints. A clean mirror enhances the beauty of your decorations.
Mounting And Display
Mounting and displaying your decorative mirror can enhance any room. This process ensures your mirror is both functional and stylish. Let’s explore the best ways to mount and display your creation.
Choosing A Location
Select a spot that complements your room’s decor. The location should reflect light well. This will brighten your space. Consider placing the mirror opposite a window. It will make the room appear larger. Avoid busy areas where the mirror could be bumped or damaged.
Hanging Techniques
Use sturdy hooks or brackets for hanging. Ensure they can support the mirror’s weight. For a more secure hold, use wall anchors. They provide extra stability. Mark the wall where you want the mirror to hang. Measure twice to ensure accuracy. Drill holes and insert the anchors. Attach the hooks or brackets to the anchors. Finally, hang the mirror and adjust as needed.

Credit: www.pinterest.com
Conclusion
Creating your own decorative mirror at home is simple and fun. With basic materials, you can design a unique piece. It adds charm to any room. Plus, it’s a budget-friendly project. You only need creativity and some spare time. Follow the steps mentioned, and enjoy the process.
Your custom mirror will impress guests and brighten your space. Try this DIY project today and see the transformation. Happy crafting!
