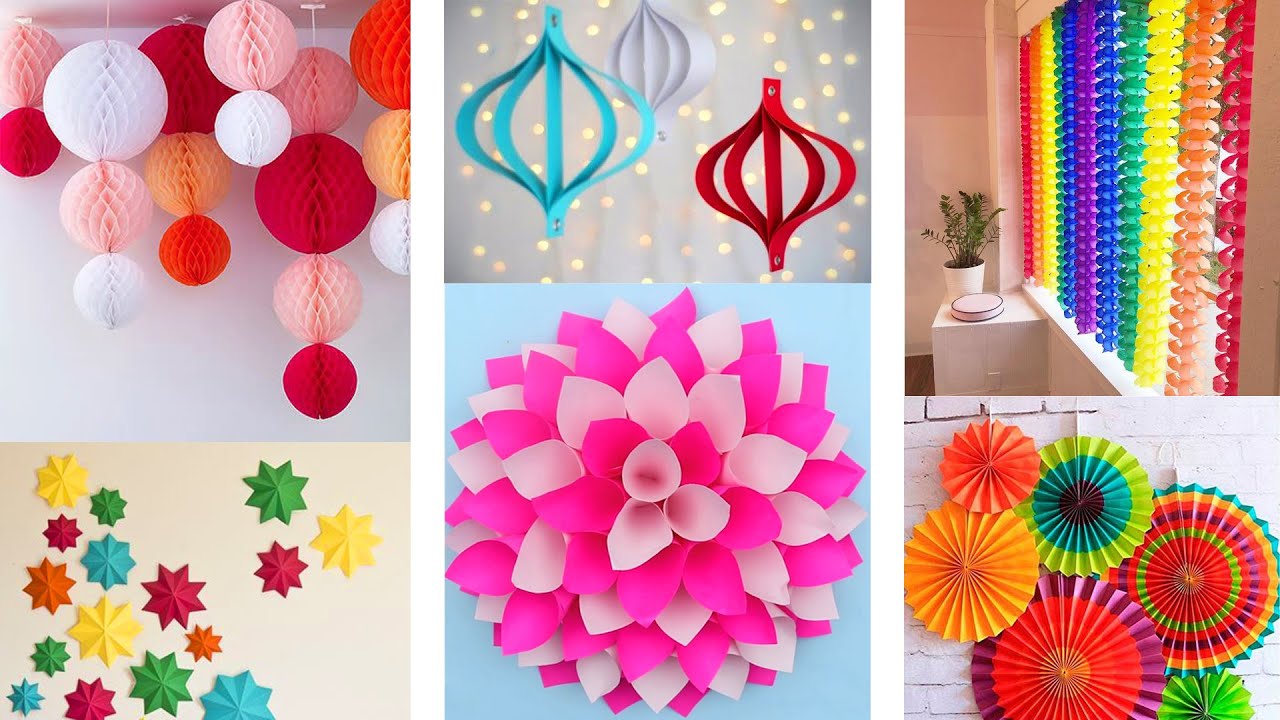
How to Make Decorative Items at Home With Paper: Easy DIY Ideas
Want to spruce up your home with DIY crafts? Paper is a great medium for making decorative items.
It’s affordable, versatile, and easy to work with. Crafting with paper can be both fun and rewarding. You don’t need fancy tools or materials to create beautiful decor. From intricate paper flowers to colorful garlands, the possibilities are endless. This blog post will guide you through simple steps to make stunning decorative items at home.
Whether you are new to crafting or a seasoned pro, you’ll find ideas that suit your style and skill level. Let’s dive into the world of paper crafting and bring some creativity into your home!
Materials Needed
Creating decorative items at home with paper can be a fun activity. It’s simple, budget-friendly, and allows for endless creativity. But before you start, you need to gather some essential materials. This section will guide you through the types of paper and basic tools required for your paper crafting projects.
Types Of Paper
Different types of paper work best for different projects. Here are some common options:
- Construction Paper: Great for beginners. It’s colorful and easy to cut.
- Origami Paper: Thin and square. Perfect for folding intricate designs.
- Scrapbook Paper: Comes in various patterns. Ideal for decorative and layered projects.
- Cardstock: Thick and sturdy. Good for making cards and sturdy decorations.
- Tissue Paper: Thin and delicate. Excellent for creating flowers and soft textures.
Basic Tools
Besides paper, you will need some basic tools to get started:
- Scissors: Sharp and precise scissors make cutting easier.
- Glue: Use white glue or a glue stick for most projects.
- Ruler: Essential for measuring and straight lines.
- Pencil: For marking and sketching designs before cutting.
- Craft Knife: Useful for detailed cuts.
- Cutting Mat: Protects your work surface while cutting.
Having the right materials and tools is crucial for successful paper crafting. Gather these items before you start, and you will be ready to create beautiful paper decorations.
Paper Flowers
Creating paper flowers at home is a delightful and easy craft. These beautiful blooms can brighten up any room. Plus, they make perfect gifts. Follow this guide to make your own paper flowers.
Choosing Colors
Choosing the right colors for your paper flowers is essential. Here are some tips:
- Bright colors: Use bright colors for a cheerful look.
- Pastel shades: Pastels give a soft, elegant touch.
- Complementary colors: Combine colors that go well together.
Experiment with different color combinations. Find what makes you happy.
Step-by-step Guide
Follow these steps to create your own paper flowers:
- Gather materials: You’ll need colored paper, scissors, glue, and a pencil.
- Cut the petals: Draw petal shapes on the paper. Cut them out carefully.
- Shape the petals: Use a pencil to curl the edges of the petals.
- Assemble the flower: Glue the petals together, starting from the center. Add more layers for a fuller flower.
- Add details: Cut a small circle for the center. Glue it in place.
- Finish the stem: Roll a strip of green paper for the stem. Attach it to the flower.
Repeat these steps to make a bouquet. Enjoy your homemade decoration.
Paper Lanterns
Creating paper lanterns at home can be a fun and creative activity. These decorative items can add charm and warmth to any room. You can use different colors and designs to match your home decor. Making paper lanterns is also a great way to spend time with family and friends.
Design Variations
There are many ways to design your paper lanterns. You can choose different shapes like round, square, or star-shaped. Use colored paper, patterned paper, or even recycled paper. Add cut-out designs to make the lanterns more unique. You can also paint or draw on the paper before assembling the lanterns. Stickers, ribbons, and glitter can also enhance the look of your lanterns.
Assembly Instructions
To make a simple paper lantern, start with a rectangular piece of paper. Fold the paper in half lengthwise. Cut slits along the folded edge, leaving about an inch uncut at the top. Unfold the paper and form it into a cylinder. Tape or glue the edges together. Add a handle by cutting a strip of paper and attaching it to the top. For a sturdier lantern, use thicker paper or cardstock.
For a more complex design, follow a template. You can find many free templates online. Print the template on your chosen paper and cut it out. Follow the instructions to fold and assemble the lantern. Use a battery-operated tea light inside the lantern for a safe and warm glow.
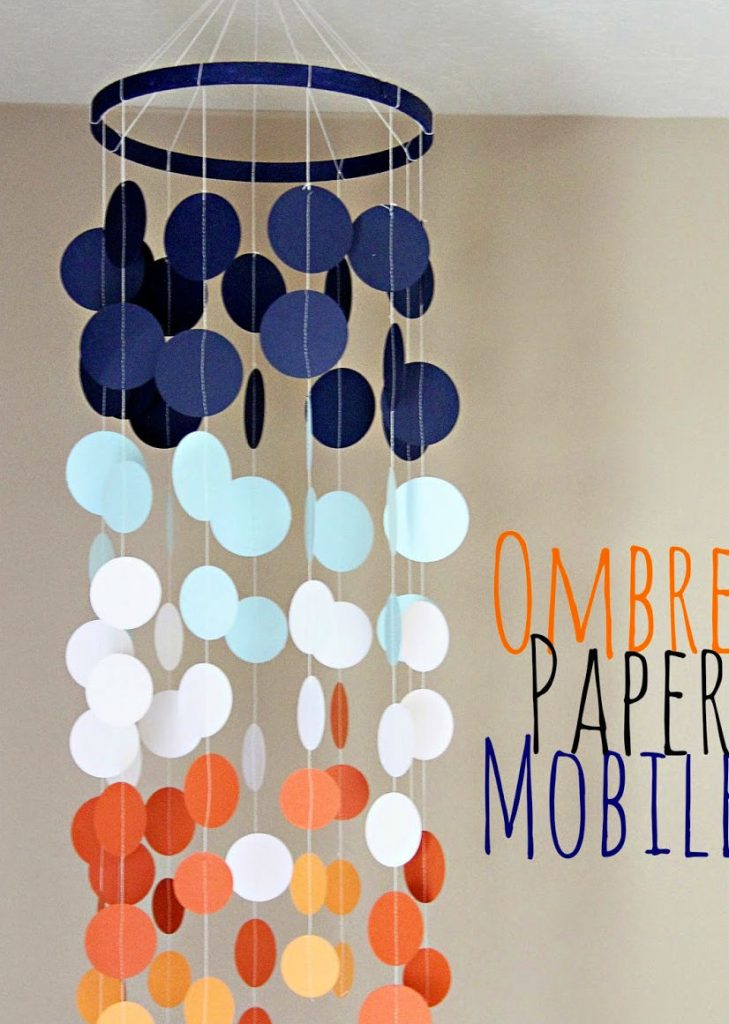
Credit: creativekhadija.com
Paper Garlands
Creating decorative items at home can be a fun and fulfilling activity. One popular DIY project is making paper garlands. They add a festive touch to any event or room. Plus, they are budget-friendly and easy to make.
Pattern Ideas
There are many patterns you can try for your paper garlands. Here are a few simple ideas to get you started:
- Circle Garland: Cut circles from colored paper. String them together.
- Star Garland: Use star-shaped cutouts. Ideal for festive seasons.
- Heart Garland: Perfect for romantic occasions. Use red or pink paper.
- Flower Garland: Cut flower shapes. Use bright paper for a cheerful look.
Hanging Tips
Once your garland is ready, it’s time to hang it up. Here are some tips to make it look great:
- Use Clear Tape: It will keep the focus on your garland.
- Choose the Right Spot: Hang it where it will be most visible.
- Keep it Secure: Use thumbtacks or hooks for added security.
- Adjust the Length: Make sure it fits the space well.
Creating paper garlands is a great way to add a personal touch to your decor. With a few simple materials and some creativity, you can transform any space. Happy crafting!
Paper Wall Art
Paper wall art is a cost-effective way to beautify your home. It allows you to bring your creativity to life. You can make stunning decorations with just a few supplies. This activity is perfect for all age groups. It is a fun and relaxing hobby. Let’s explore how to create and mount paper wall art.
Creating Designs
Start by gathering your materials. You need colored paper, scissors, glue, and a pencil. Choose a design that suits your taste. You can opt for flowers, geometric shapes, or abstract art. Sketch your design on the paper. Cut out the shapes carefully with scissors. Precision is key for a polished look. Arrange the cutouts on a flat surface. Experiment with different layouts until you find the best one.
Mounting Techniques
Mounting your paper art can enhance its visual appeal. Use a sturdy backing to support your design. A piece of cardboard or a canvas works well. Apply glue to the back of each cutout. Press them gently onto the backing. Ensure there are no air bubbles. For a three-dimensional effect, use foam tape. This adds depth and interest to your art. Frame your finished piece for a professional look. Hang it on your wall and admire your handiwork.
Paper Sculptures
Creating paper sculptures at home can be a fun and rewarding activity. You can transform simple sheets of paper into beautiful 3D art. With a few basic techniques, you can create intricate designs that amaze your friends and family.
Paper sculptures do not require fancy tools or expensive materials. All you need is paper, scissors, and glue. Let’s dive into the exciting world of paper sculptures.
3d Shapes
Start by learning how to make basic 3D shapes. You can create cubes, pyramids, and spheres. These shapes form the foundation of more complex sculptures.
Begin with a simple cube. Cut six squares of the same size. Fold the edges to create tabs for gluing. Assemble the squares into a cube by gluing the tabs together.
Next, try making a pyramid. Cut four triangles and one square base. Fold tabs on the edges of the triangles. Glue the triangles to the base and to each other.
For a sphere, cut several circular pieces. Fold each piece slightly and glue them together. This creates a rounded, ball-like shape.
Structural Support
Adding structural support is crucial for stability. Use thicker paper for larger sculptures. This provides a strong foundation and prevents sagging.
Reinforce the inside of your shapes. Place small strips of paper inside to add strength. This technique helps the sculpture maintain its form.
Layering paper can also provide support. Glue multiple layers of paper together. This creates a sturdier structure without adding too much weight.
Experiment with different techniques to find what works best. Each sculpture may require unique methods for support.
Paper Gift Wraps
Creating decorative items at home with paper can be a delightful experience. One exciting project is making paper gift wraps. They add a personal touch to gifts, making them unique. You can easily craft these at home with simple materials and techniques.
Creative Wrapping
Using paper for gift wrapping allows endless creativity. You can start with colorful paper. Try using different textures and patterns. Here are some ideas:
- Use old magazines for a unique look.
- Try brown kraft paper for a rustic feel.
- Decorate with stamps or stickers.
For a more refined look, add ribbons or bows. Use natural elements like leaves or flowers for an eco-friendly touch.
Personalized Touches
Adding personalized touches makes the gift even more special. Here are a few simple ways:
- Write a personal note on the paper wrap.
- Draw or paint custom designs.
- Include the recipient’s name or initials.
Use stencils for neat designs. Or, try your hand at freehand drawing. Personalized touches show thoughtfulness and care.
| Material | Usage |
|---|---|
| Colored Paper | Base wrapping material |
| Stickers | Decoration |
| Ribbons | Finishing touch |
| Stamps | Custom patterns |
Making paper gift wraps is fun and easy. It adds a personal touch to every gift.

Credit: www.youtube.com
Tips For Beginners
Creating decorative items at home with paper can be a fun and fulfilling hobby. It’s a great way to make personalized gifts, home decor, and even seasonal decorations. If you’re new to paper crafting, start with some basic tips to make your experience enjoyable and successful.
Common Mistakes
Beginners often make some common mistakes when starting with paper crafts. Avoiding these can save you time and frustration. Here are a few to watch out for:
- Using the wrong type of paper: Different projects need different paper types. Use thicker paper for sturdy items and thinner paper for delicate designs.
- Cutting inaccurately: Ensure you have sharp scissors and take your time to cut precisely.
- Not measuring properly: Always measure twice before cutting. This helps avoid wasted materials.
- Ignoring glue drying time: Let the glue dry completely before moving on to the next step.
Helpful Resources
As a beginner, you can benefit from various resources to help you get started:
| Resource Type | Description |
|---|---|
| Online Tutorials | Platforms like YouTube offer step-by-step guides for different projects. |
| Craft Books | Books provide detailed instructions and inspiration for various paper crafts. |
| Craft Stores | Local stores often have workshops and knowledgeable staff to help. |
| Community Groups | Joining a crafting group can provide support and new ideas. |
Starting a new hobby can be overwhelming, but with the right tips and resources, you can make beautiful decorative items from paper. Remember to be patient and enjoy the process. Happy crafting!
Credit: www.quora.com
Conclusion
Creating decorative items with paper can be fun and rewarding. It allows you to express creativity without spending much. Remember, practice improves your skills. Start with simple projects and gradually try more complex designs. Enjoy the process and let your imagination guide you.
Making paper crafts can also be a relaxing activity. It brings joy to see your creations come to life. So gather your materials and start crafting today. Happy crafting!
